1. 프로젝트 선정
요즘 아동폭력 이슈가 우리 사회의 큰 문제가 되고 있다
우리 팀은 아동폭력 실태를 함께 살펴보며 아동폭력을 근절할 수 있는 시스템을 만들면 어떨까에 대해 심도있게 논의하였고, 몇번의 회의 끝에 "yolo와 openpose를 이용한 인공지능 아동학대 감지시스템"을 프로젝트 주제로 확정하게 되었다.

우리가 생각한 아동폭력 클래스는 크게 3가지로 때리기, 밀치기, 발로차기가 있다.
우선 yolo를 통해 아동폭력 클래스를 1차 검출하고 나면, openpose keypoint로 다양한 feature을 추출한다.
feature로는 가속도, 사잇각, 접촉도 등이 있다.
이 feature들을 LSTM 모델에 넣어 최종적으로 폭력을 인식하는 모델을 구성할 생각이다.
(+정신적 학대 감지를 위한 맥박 검출 모듈 추가 예정)
2. 개발환경
Desktop(personal)
- Windows10 GTX1660S
NVIDIA Jetson Nano Development Kit-B01
- GPU : 128 코어 Maxwell CPU : 쿼드코어 ARM A57 @ 1.43GHz
GPU Server
- Google Colab GPU
Camera
- Logitech C920 Pro
- Phone
Program
- OpenCV 4.1.0
- YOLO V4 - Darknet framework
- OPENPOSE
- Yolo_mark를 이용한 라벨링은 각자의 컴퓨터 혹은 노트북 이용
- GPU Server(GPU 컴퓨터)에 학습시킬 아동폭력 이미지들은 각자 스마트폰으로 직접 촬영해서 구함
- CCTV의 위치처럼 카메라가 보다 자유롭게 움직여야 하며 프로그램이 실시간으로 처리된다는 것을 증명하기 위해
Logitech(로지텍)의 C920 Pro 모델 사용
- 컴퓨터나 노트북의 그래픽 카드 성능이 현저히 떨어지기 때문에 학습에 좋은 Colab GPU Server 구매
- 라벨링 및 테스트 영상, 이미지 실행을 위해 오픈소스인 OpenCV 4.1.0, YOLO V4, openpose를 사용
3. 윈도우 환경에서 YOLO 세팅하기
HELL 게이트 시작....path 오류 고치느라 죽을뻔;;
이 튜토리얼을 보시고 따라하실 분들은 그냥 우분투 깔아서 깨끗한 환경에서 시작하세요....^^
윈도우는 아니야,,,,도망챠~~~

3.0. 나의 환경
OS: Windows 10
Graphic Card: GForce GTX 1660 Super
CUDA: 10.2
cuDNN: 7.6.5
Visual Studio 2019
3.1. CUDA 10.2 , cuDNN v7.6.5 설치
그래픽카드가 GTX 1660 Super이기 때문에 필자는 CUDA 10.2 버전을 사용하였다.
Compute capability에 따라 설치할 수 있는 CUDA 버전이 있으므로 아래 위키 문서를 보고 각자 그래픽드라이버 사양에 맞는 쿠다를 설치하도록!
https://en.wikipedia.org/wiki/CUDA
CUDA - Wikipedia
From Wikipedia, the free encyclopedia Jump to navigation Jump to search Parallel computing platform and programming model CUDA (an acronym for Compute Unified Device Architecture) is a parallel computing platform and application programming interface (API)
en.wikipedia.org
CUDA 버전 잘 선택해서 다운받고 설치까지 다 끝냈으면 cuDNN을 다운받는다
https://developer.nvidia.com/cuda-toolkit-archive
CUDA Toolkit Archive
Previous releases of the CUDA Toolkit, GPU Computing SDK, documentation and developer drivers can be found using the links below. Please select the release you want from the list below, and be sure to check www.nvidia.com/drivers for more recent production
developer.nvidia.com
CUDA 버전과 상용하는 cuDNN 다운로드 해준다.
https://developer.nvidia.com/cudnn
NVIDIA cuDNN
NVIDIA cuDNN The NVIDIA CUDA® Deep Neural Network library (cuDNN) is a GPU-accelerated library of primitives for deep neural networks. cuDNN provides highly tuned implementations for standard routines such as forward and backward convolution, pooling, nor
developer.nvidia.com
cuDNN 다운까지 마쳤으면 cuDNN 압축풀고
bin 폴더 내의 cudnn64_7.dll 파일을 C드라이브 내의 NVIDIA GPU Computing Toolkit → CUDA → 10.2 → bin 에 복붙
include 폴더 내의 cudnn.h 파일을 마찬가지로 NVIDIA GPU Computing Toolkit → CUDA → 10.2 → include 에 복붙
lib 폴더 내의 cudnn.lib 파일을 마찬가지로 NVIDIA GPU Computing Toolkit → CUDA → 10.2 →ㅍlib 에 복붙
위 세가지 복붙 과정이 꼭 필요함!
3.2. OpenCV 4.1.0 설치
https://opencv.org/releases/page/3/
Releases - OpenCV
Become a Member Stay up to date on OpenCV and Computer Vision news Join our Newsletter
opencv.org
https://github.com/opencv/opencv_contrib
opencv/opencv_contrib
Repository for OpenCV's extra modules. Contribute to opencv/opencv_contrib development by creating an account on GitHub.
github.com
OpenCV 4.1.0 와 OpenCV contrib을 다운받아 압축을 풀어준 다음 OpenCV 4.1.0을 CMake로 Configuration해준다.

CMake Configuration할때 BUILD_opencv_world 꼭 체크해줄것!
그런다음, opencv를 visual studio2019로 빌드해주면 끝이다

3.3. darknet 설치 및 환경 세팅
https://github.com/AlexeyAB/darknet
AlexeyAB/darknet
YOLOv4 / Scaled-YOLOv4 / YOLO - Neural Networks for Object Detection (Windows and Linux version of Darknet ) - AlexeyAB/darknet
github.com
darknet 파일을 받아주고 압축을 풀어준다.
darknet 파일 내부 x64 폴더 내에 다음의 OpenCV, cnDNN 파일들을 복사해서 붙여넣는다
- OpenCV_ffmpeg410_64.dll
- OpenCV_world410.dll
- cndnn64_7.dll
darknet.vcxproj 와 yolo_cpp_dll.vcxproj 파일을 Notepad++로 cuda 버전에 맞게 수정해준다.


버전을 수정해준 다음, yolo_cpp_dll.vcxproj 파일을 업데이트 버전이 적용될 수 있도록 vs로 compile 해준다.
이제 드디어 마지막 단계!!!!!!

마지막으로 darkent만 compile 해주면 되는데
자세한 환경변수 설정은 다음 유툽 튜토리얼 영상을 보고 따라하면 된다..
(컴파일 에러 너무 심했는데,,,,이거보고 한방에 해결했다!)
https://www.youtube.com/watch?v=sUxAVpzZ8hU
3.4. 간단한 예제 실행
https://pjreddie.com/media/files/yolov3.weights
우선 미리 훈련된 weights 파일을 다운받아서 darknet-master\build\darknet\x64 폴더안에 넣어주고,
폴더에 들어가서 빈 곳에 Shift + 오른쪽버튼을 누르면 PowerShell 창 열기가 뜨는데 간단한 예제를 돌려보자

결과가 잘 나온다...!!
4. 윈도우에서 YOLOv4 Custom하기
이제 yolov4 세팅까지 마쳤으니 데이터를 라벨링하고 학습을 돌릴 차례이다...또르르

5살 아동 마네킹을 구매해서 폭력행위 시연해보았다
때리는 클래스 학습을 위해서 학습데이터를 700장 정도 수작업으로 만들었다 (찍으면서 다들 현타..ㅎㅎ)
4.1. 라벨링
https://github.com/tzutalin/labelImg
tzutalin/labelImg
🖍️ LabelImg is a graphical image annotation tool and label object bounding boxes in images - tzutalin/labelImg
github.com
윈도우용 라벨링 UI 파일을 다운받고 압축을 풀어 관리자 권한으로 실행시키면,

라벨링할 수 있는 UI가 이렇게 뜬다
데이터 불러와서 박스쳐주는 수작업을 일일히 해주면 좌표 파일이 생성됨....(개노가다)

4.2. 데이터학습
https://www.youtube.com/watch?v=-NEB5P-SLi0&list=PLUE9cBml08yiahlgN1BDv_8dAJFeCIR1u&index=5
이제 학습데이터를 모델에 넣어서 학습시켜주는 작업을 진행해준다
위의 튜토리얼 영상을 참고하면 수월하게 진행할 수 있다
장장 14시간동안 컴퓨터를 혹사시켜 학습시킨 결과,,,,,

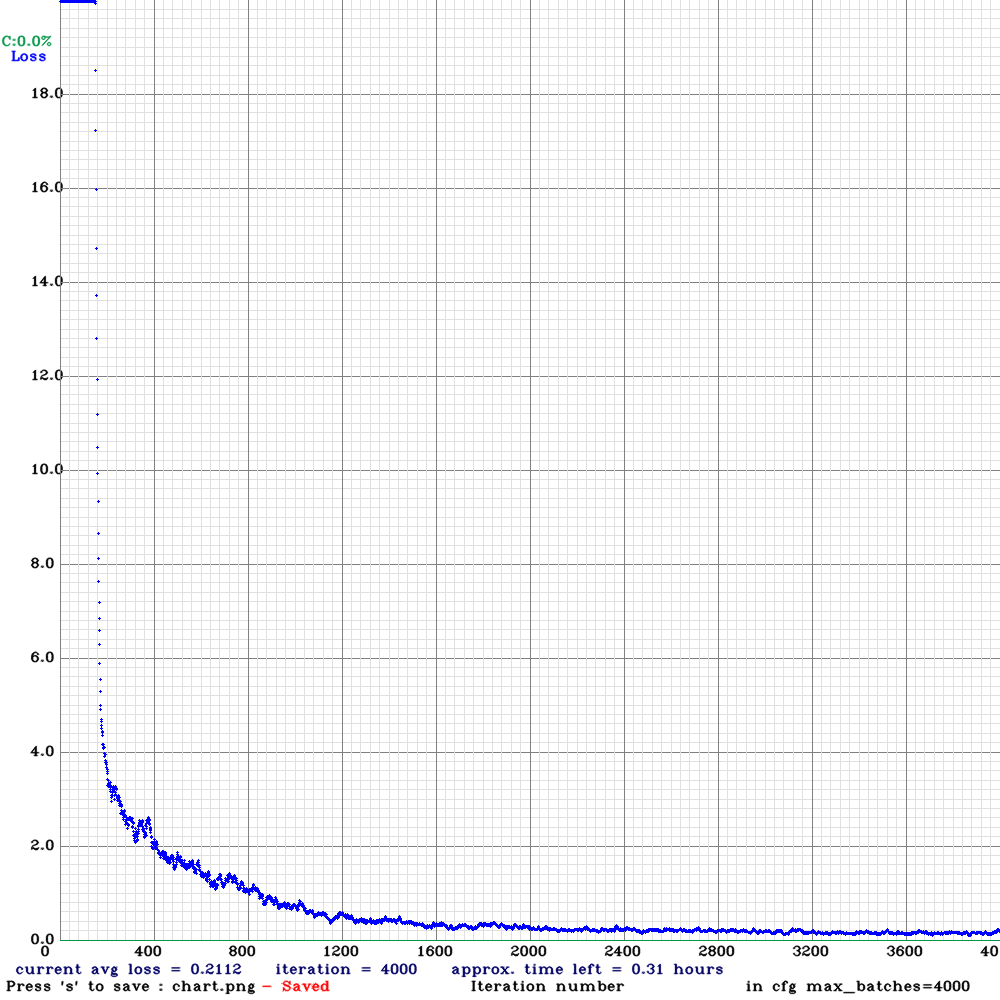
결과가 잘 나왔다
그,런,데!!!!

yolov4 모델이 python 환경에서 안돌아가고 오류가 발생한다는 청천벽력같은 소식을 나중에서야 접했고...
어쩔수 없이 구글 코랩에서 gpu를 구매해 yolov3 버전으로 모델을 다시 학습시켰다....

흠,,,,가방을 폭력으로 인식하네,,,,,????
학습데이터 수가 너무 적어서 이러는것 같은데 더 학습시켜봐야 할 것 같다...ㅎㅎ
5. 후작업(SVM, LSTM)
YOLO로 폭력행위를 Detection한 다음에,
가속도/사잇값/접촉여부 등의 feature를 이용해 최종적인 폭력행위 여부를 판단하는 후작업이 필요
(코드 수정중....)
import sys
import cv2
import numpy as np
import math
def openpose(frame,out,nparts): #점만 검출하는 역할
h, w = frame.shape[:2]
# 검출된 점 추출
points = []
for i in range(nparts):
heatMap = out[0, i, :, :]
_, conf, _, point = cv2.minMaxLoc(heatMap) #최대값 찾기(최대값만 받음)
x = int(w * point[0] / out.shape[3])
y = int(h * point[1] / out.shape[2])
points.append((x, y) if conf > 0.1 else None) # heat map threshold=0.1 #에러일 수 있는 부분 무시
return points
################################### main ########################################################
cap = cv2.VideoCapture(0)
time = 1/30
if not cap.isOpened():
print("camera not open!")
sys.exit()
w = round(cap.get(cv2.CAP_PROP_FRAME_WIDTH))
h = round(cap.get(cv2.CAP_PROP_FRAME_HEIGHT))
fps = cap.get(cv2.CAP_PROP_FPS)
fourcc = cv2.VideoWriter_fourcc(*"DIVX")
delay = round(1000/fps)
# yolov3 모델 & 설정 파일
yolo = './yolo_v3/yolov3.weights'
yolo_config = './yolo_v3/yolov3.cfg'
class_labels = './yolo_v3/coco.names'
confThreshold = 0.5
nmsThreshold = 0.4
# openpose 모델 & 설정 파일
openpose = './openpose/pose_iter_440000.caffemodel' #절대경로 지정
openpose_config = './openpose/pose_deploy_linevec.prototxt' #절대경로 지정
# 네트워크 생성
yolo_net = cv2.dnn.readNet(yolo, yolo_config)
openpose_net = cv2.dnn.readNet(openpose, openpose_config)
if yolo_net.empty() or openpose_net.empty():
print('Net open failed!')
sys.exit()
# 클래스 이름 불러오기
classes = []
with open(class_labels, 'rt') as f:
classes = f.read().rstrip('\n').split('\n')
colors = np.random.uniform(0, 255, size=(len(classes), 3))
# 출력 레이어 이름 받아오기
layer_names = yolo_net.getLayerNames()
output_layers = [layer_names[i[0] - 1] for i in yolo_net.getUnconnectedOutLayers()]
flag = [False,0,0,0,0] # True이면 openpose로 넘겨주기 위함
count = 1
while True:
name = "./test/{}.avi".format(count)
out = cv2.VideoWriter(name,fourcc,fps,(w,h))
if not out.isOpened():
print("output file open failed")
cap.release()
sys.exit()
for i in range(300):
ret, frame = cap.read()
if not ret:
break
blob = cv2.dnn.blobFromImage(frame, 1/255., (320, 320), swapRB=True)
yolo_net.setInput(blob)
outs = yolo_net.forward(output_layers)
class_ids = []
confidences = []
boxes = []
#detection 감지하기
for detect in outs:
for detection in detect:
scores = detection[5:]
class_id = np.argmax(scores)
confidence = scores[class_id]
if confidence > confThreshold:
# 바운딩 박스 중심 좌표 & 박스 크기
cx = int(detection[0] * w)
cy = int(detection[1] * h)
bw = int(detection[2] * w)
bh = int(detection[3] * h)
# 바운딩 박스 좌상단 좌표
sx = int(cx - bw / 2)
sy = int(cy - bh / 2)
boxes.append([sx, sy, bw, bh])
confidences.append(float(confidence))
class_ids.append(int(class_id))
# 비최대 억제
indices = cv2.dnn.NMSBoxes(boxes, confidences, confThreshold, nmsThreshold)
for j in indices:
j = j[0]
sx, sy, bw, bh = boxes[j]
label = f'{classes[class_ids[j]]}: {confidences[j]:.2}'
if 'person' in label:
flag[0] = True
flag[1] = sx
flag[2] = sy
flag[3] = bw
flag[4] = bh
color = colors[class_ids[j]]
cv2.rectangle(frame, (sx, sy, bw, bh), color, 2)
cv2.putText(frame, label, (sx, sy - 10),cv2.FONT_HERSHEY_SIMPLEX, 0.7, color, 2, cv2.LINE_AA)
check = 'i = {}, count = {}'.format(i,count)
cv2.putText(frame, check, (50 ,200), cv2.FONT_HERSHEY_SIMPLEX,1, (0, 0, 255), 3, cv2.LINE_AA)
out.write(frame)
cv2.imshow("frame",frame)
cv2.waitKey(delay)
#openpose 넘겨주기
if flag[0]:
cap_openpose = cv2.VideoCapture(name)
ret,frame = cap_openpose.read()
x = flag[1]
y = flag[3]
h2 = flag[4]
w2 = flag[2]
#frame_crop = frame[y:y+h,x:x+w] #일단 좀더 늘려보고
prv_pt = []
cur_pt = []
nparts = 8
if not ret:
print("없음")
break
frame = cv2.resize(frame, dsize=(480, 640), interpolation=cv2.INTER_AREA)
blob = cv2.dnn.blobFromImage(frame, 1/255., (368, 368))
openpose_net.setInput(blob)
out = openpose_net.forward() # out.shape=(1, 57, 46, 46)
prv_pt = openpose(frame,out,nparts)
while True:
ret,frame = cap_openpose.read()
#frame_crop = frame[y:y+h,x:x+w] #일단 좀더 늘려보기
frame = cv2.resize(frame, dsize=(480, 640), interpolation=cv2.INTER_AREA)
blob = cv2.dnn.blobFromImage(frame, 1/255., (368, 368))
openpose_net.setInput(blob)
out = openpose_net.forward() # out.shape=(1, 57, 46, 46)
cur_pt = openpose(frame,out,nparts)
# #cur 과 prv pt 속도 계산 ->vx,vy넘겨주기
# vx,vy = (cur_pt[1] - prv_pt[1]) / time
# mag, ang = cv2.cartToPolar(vx, vy) #극좌표계 성분으로 바뀌면서 벡터의 크기와 각도로 계산.
# label = '!!!!!!!!!!!!'
# print("크기: ",mag)
# if mag > 10.0: #평균 벡터가 12이상인것만 다루게 함-> 충분히 움직이 큰것만 처리 위에서
# cv2.putText(frame, label, (50 ,200), cv2.FONT_HERSHEY_SIMPLEX,
# 5, (0, 0, 255), 3, cv2.LINE_AA)
cv2.imshow('frame', frame)
if cv2.waitKey(1) == 27:
break
prv_pt = cur_pt
if count == 6:
break
flag[0] = False
count = count+1
out.release()
cap.release()
cv2.destroyAllWindows()
6. 알리미 어플
작업중